Introduction #
Vultr is a global cloud provider with a strong reputation for speed and reliability. In our comparison of the best servers for Odoo, Vultr delivered the best performance in the entry-level price range, making it an excellent choice if you want to start small while still getting responsive performance.
With Cloudpepper, connecting your Vultr account is simple: just enter your API key. Once connected, you can create servers directly from your Cloudpepper dashboard and deploy Odoo in a few clicks.
Requirements #
- Base, Pro or Agency plan with Cloudpepper
- Vultr Account (sign up with $300 credit to test)
Step 1. Connect Vultr to Cloudpepper #
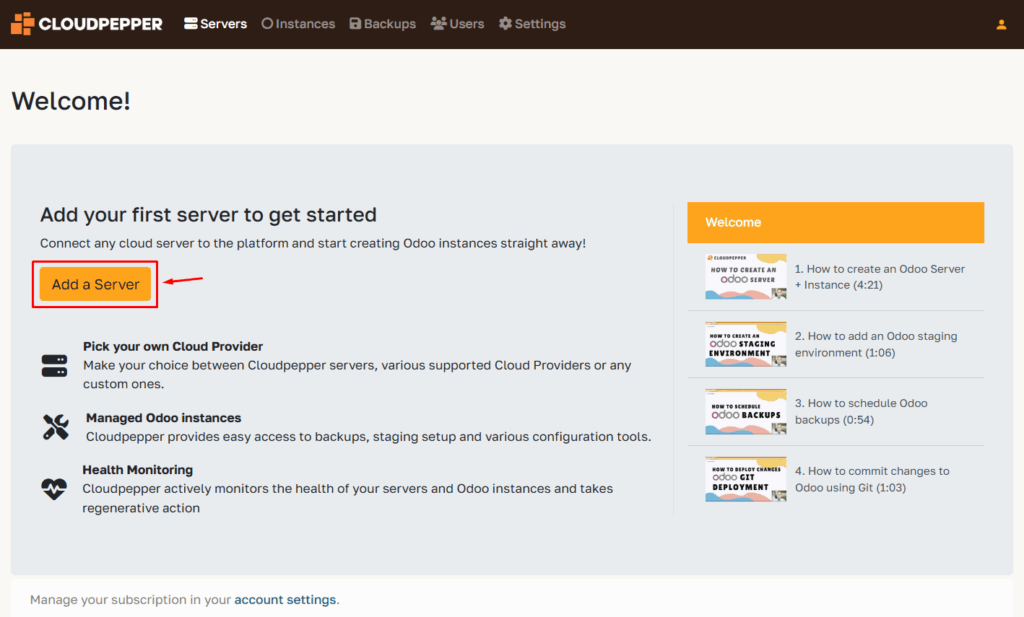
1.1 Add a server #
Before you can provision servers in your Vultr account from the Cloudpepper dashboard, we need to connect your Vultr account. In your Cloudpepper dashboard, click Add a Server.
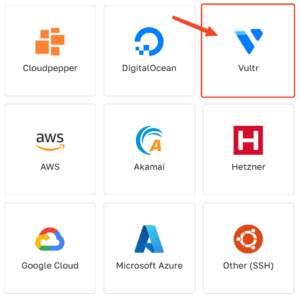
Select Vultr as your cloud provider.
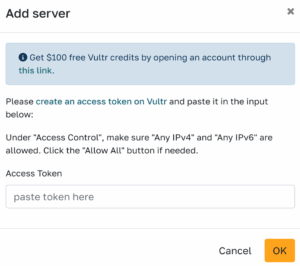
You will be asked to fill in your Vultr Access token.
1.2 Add an access token in Vultr #
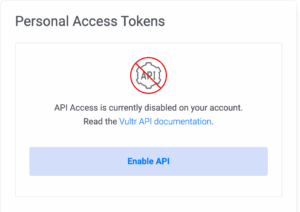
Open up API Settings in your Vultr dashboard. Ensure to Enable API for your account.
Once enabled, you will be able to add an access token. Fill in the name of the access token (eg. Cloudpepper) and whether you want it to expire. Then click Add Key.
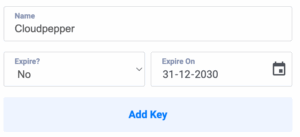
Copy the API key shown and save it. It’ll only show once.

1.3 Allow access to Cloudpepper #
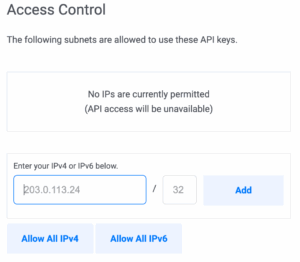
Before our platform is able to connect to your Vultr account, you will need to add our platform’s IP addresses under Access Control. Alternatively, you can select Allow All IPv4 to allow any IP address to connect with your Vultr account.
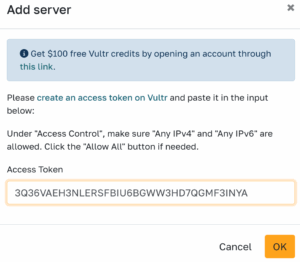
1.4 Paste the access token in Cloudpepper #
Paste the key in Cloudpepper, click OK. Your account is now successfully linked.
Step 2. Select your server #
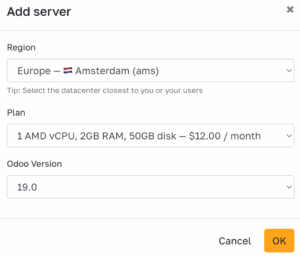
With your Vultr account connected, you’ll see a screen to configure your new server. Here’s what each option means:
- Region: Choose the datacenter where your server will run. Pick the one closest to your users for best performance. (overview of available AWS regions)
- Plan: The size of your server (overview of all sizes and prices). Not sure what to pick? Use our server sizing guide. A 1 vCPU, 2 GB RAM is sufficient for a basic Odoo instance with 6-8 concurrent users. You can always resize later as your needs grow. We recommend picking AMD High Performance.
- Odoo version: Select which version of Odoo to deploy (e.g. 17, 18, or 19).
Once you’ve filled in the details, click OK to start provisioning your server. Cloudpepper will automatically install updates, apply security settings, tune performance, and set up all required software for Odoo. The process takes about 10–20 minutes. When it’s finished, you’ll be ready to create your first Odoo instance.