Odoo High Availability on AWS (RDS or Aurora)
For high availability, this guide puts your Odoo database on a managed AWS database with a standby in a second Availability Zone (one or more separate data centers in the same region). If the database fails, the standby usually takes over in one to two minutes and Odoo reconnects, as long as its server runs. Odoo still runs on one EC2 server: there is no second Odoo server, so Odoo is down while its own zone is down.
You compare Amazon RDS for PostgreSQL Multi-AZ and Amazon Aurora PostgreSQL, then set up one of them. The steps are for the person who manages your AWS account.
At a glance
Section titled “At a glance”- Time: About 2 to 3 hours, including the S3 guide and a failover test. Much of it is waiting for AWS.
- Cost: Database as set up in Step 1: about $293 per month (RDS Multi-AZ,
db.m7g.large) or $486 (Aurora, twodb.r7g.large), plus storage. See Choose the database. - Plans: Pro and Agency
- Odoo versions: 16 to 19 for the full setup: the S3 step needs them. The database steps alone work from Odoo 14.
- What changes: A new instance keeps its database on AWS and its attachments in S3. Odoo stays on your Cloudpepper server.
What stays available
Section titled “What stays available”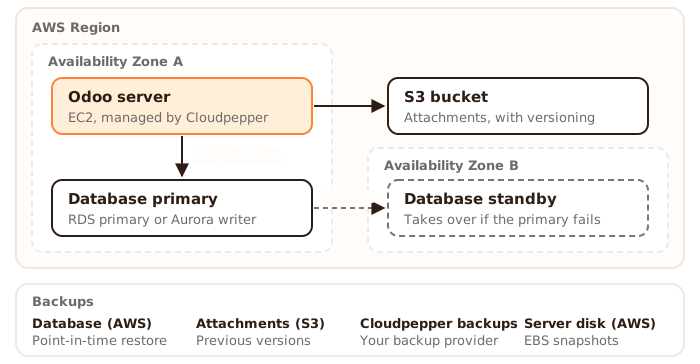
| If this fails | What happens | What you do |
|---|---|---|
| The database primary, or its zone | The standby takes over. Odoo reconnects if its server still runs. | Nothing |
| The host of the Odoo server | EC2 tries to restart the server on another host, with the same IP addresses and disk. This needs a supported instance type and spare AWS capacity. | Check the result (Step 4) |
| The disk of the Odoo server | Nothing automatic. | Restore the server disk |
| Data deleted or damaged by a person or a module | The standby copies the change too. | Restore the database to a point in time |
| The zone of the Odoo server | Odoo is down until the zone recovers. | Wait, or build a new server in another zone |
| A whole AWS region, or more load than one server handles | Not covered. |
Choose the database: RDS Multi-AZ or Aurora
Section titled “Choose the database: RDS Multi-AZ or Aurora”Both keep a standby in a second zone behind one host name, the endpoint, that always points to the current primary. Cloudpepper connects to both in the same way, over SSL.
| RDS for PostgreSQL Multi-AZ | Aurora PostgreSQL | |
|---|---|---|
| How it works | A primary and a standby in another zone. The standby takes no traffic. | A writer and a reader in another zone, on one storage volume that AWS copies across three zones. |
| Typical failover (AWS) | 60 to 120 seconds | Under 60 seconds, often under 30 |
Cost per month, 2 vCPU, 16 GiB (db.r7g.large) |
$0.582 per hour, about $425 per month | 2 × $0.333 per hour, about $486 per month |
Cost per month, 2 vCPU, 8 GiB (db.m7g.large) |
$0.401 per hour, about $293 per month | Not offered. Aurora has db.r classes and Serverless. |
| Storage | You set the size. $0.274 per GB-month (100 GB: about $27) | Grows by itself. $0.119 per GB-month (100 GB: about $12), plus $0.22 per million I/O requests |
| Pick it when | An interruption of one to two minutes is acceptable and you want a predictable bill. | You want the shortest interruption, or expect fast database growth. |
Example on-demand list prices for eu-central-1 (Frankfurt), AWS Price List of 26 October 2026 (checked 27 October), 730 hours per month, Aurora Standard storage. Not included: the EC2 server, extra backup storage, traffic between zones, tax. Check your region in the AWS Pricing Calculator.
Before you start
Section titled “Before you start”- Plan: Pro or Agency. On Base, the Use External Database switch is turned off.
- AWS server: an AWS account linked to Cloudpepper and a server for Odoo 16 to 19. See Deploy Odoo on AWS.
- Instance type: one that AWS supports for automatic recovery. Cloudpepper also lists types with instance storage, such as
m5d, which AWS does not recover. - A new instance: you choose the external database when you create the instance. The dashboard has no way to convert an existing instance.
- SSH access to the server, for the version check below and for restores. See Connect via SSH with Termius.
- A domain: a free
.cloudpepper.sitesubdomain or your own domain. - The PostgreSQL major version of your server. The AWS database must have the same one. On AWS servers, Cloudpepper usually installs:
| Odoo | 16 | 17 | 18 | 19 |
|---|---|---|---|---|
| PostgreSQL | 14 | 15 | 16 | 17 |
To be sure, run this over SSH. You should see a version such as 17.6: the major version is 17.
sudo -u postgres psql -tAc 'SHOW server_version'Step 1. Create the database
Section titled “Step 1. Create the database”Create the database in the same AWS region as your server. AWS also creates the empty Odoo database and its user, so you need no database commands. Odoo signs in as the master user of this AWS database: use the AWS database for this one Odoo instance only. The steps name the database odoo_prod. Another name works too: start with a letter, then use only lowercase letters, digits or underscores, at most 63 characters. Do not use postgres, template0 or template1.
RDS for PostgreSQL Multi-AZ
Section titled “RDS for PostgreSQL Multi-AZ”-
In the RDS console, choose Databases → Create database.
-
Choose Full configuration and engine type PostgreSQL.
-
For Engine version, choose the newest release of your server’s major version, for example
PostgreSQL 17.x. -
For Templates, choose Production.
-
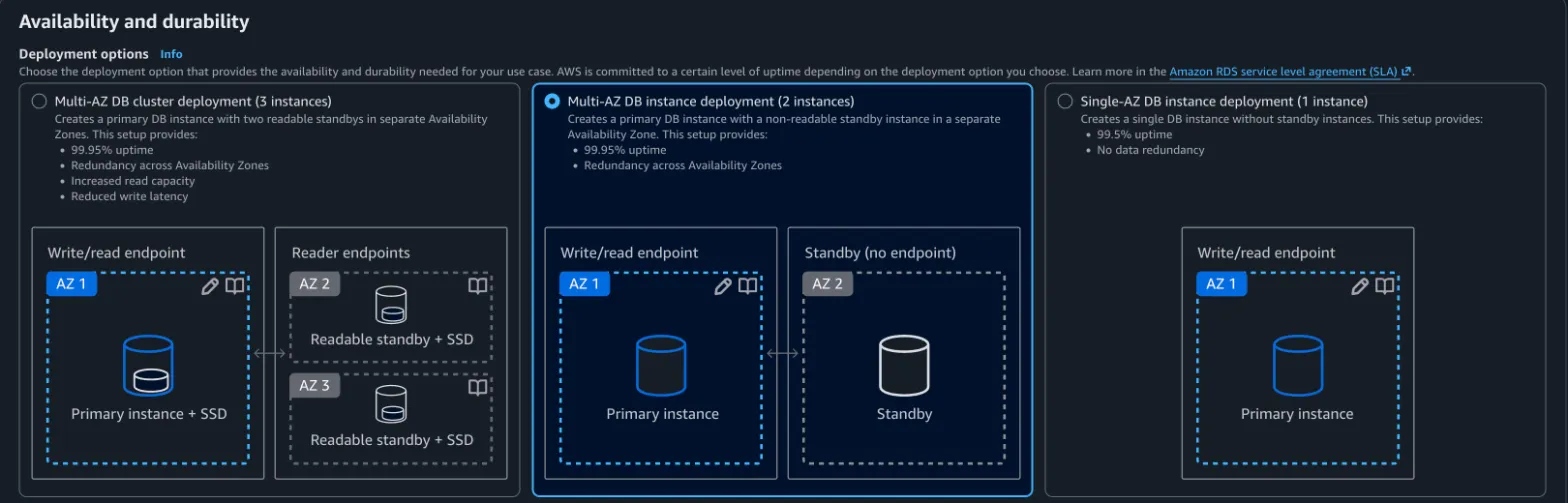
Under Availability and durability, choose Multi-AZ DB instance deployment (2 instances): a primary and a standby in another Availability Zone.
-
For DB instance identifier, enter
odoo-db. -
For Master username, enter
odoo. Choose Self managed and enter a strong master password. Save it: Odoo signs in with this user and password. -
For DB instance class, choose
db.m7g.largeor larger. -
For Storage type, choose General Purpose SSD (gp3). The Production template selects Provisioned IOPS SSD (io2) with 400 GiB, which costs far more.
-
For Allocated storage, enter at least 20 GiB, with room for the growth of your Odoo database.
-
Under Connectivity, for Compute resource choose Connect to an EC2 compute resource, then select your Cloudpepper server under EC2 instance. AWS creates the security groups (AWS firewall rules) that let only this server reach the database, and sets Public access to No.

-
Under Additional configuration, for Initial database name, enter
odoo_prod. This is<your-database-name>. Set Backup retention period to 7 days or more, and keep Enable deletion protection. -
Choose Create database. You should see
odoo-dbwith status Creating, then Available, often after 10 to 20 minutes. -
Open
odoo-db→ Connectivity & security and copy the Endpoint. You should see a host name that ends in.rds.amazonaws.com. This is<your-database-endpoint>.
Aurora PostgreSQL
Section titled “Aurora PostgreSQL”- In the RDS console, choose Databases → Create database.
- Choose Full configuration and engine type Aurora (PostgreSQL Compatible).
- For Templates, choose Production.
- For Cluster scalability type, choose Provisioned.
- For Engine version, choose the newest release of your server’s major version, for example
17.x. - For DB cluster identifier, enter
odoo-db. - For Master username, enter
odoo. Choose Self managed and enter a strong master password. Save it: Odoo signs in with this user and password. - For Cluster storage configuration, choose Aurora Standard.
- For DB instance class, keep Memory optimized classes and choose
db.r7g.largeor larger. - Under Availability & durability, choose Create an Aurora Replica or Reader node in a different AZ. This is the standby.
- Under Connectivity, for Compute resource choose Connect to an EC2 compute resource, then select your Cloudpepper server under EC2 instance. AWS creates the security groups (AWS firewall rules) that let only this server reach the database, and sets Public access to No.
- Under Additional configuration, for Initial database name, enter
odoo_prod. This is<your-database-name>. Set Backup retention period to 7 days or more, and keep Enable deletion protection. - Choose Create database. You should see the cluster
odoo-dbwith a Writer instance and a Reader instance, all Available after often 10 to 20 minutes. - Open the cluster → Connectivity & security and copy the endpoint of type Writer. You should see a host name that contains
.cluster-. This is<your-database-endpoint>.
Step 2. Create the Odoo instance with the external database
Section titled “Step 2. Create the Odoo instance with the external database”-
Own domain only: point the domain’s A record to your server’s IPv4 address, shown on the server page in My Cloudpepper, and remove any AAAA record. Cloudpepper needs this for the HTTPS certificate. See Configure your custom domain DNS, also for Cloudflare.
-
In My Cloudpepper, open Instances and click Add Instance.
-
For Server, select your AWS server.
-
For Domain name, keep the free
.cloudpepper.sitename or enter your own domain. -
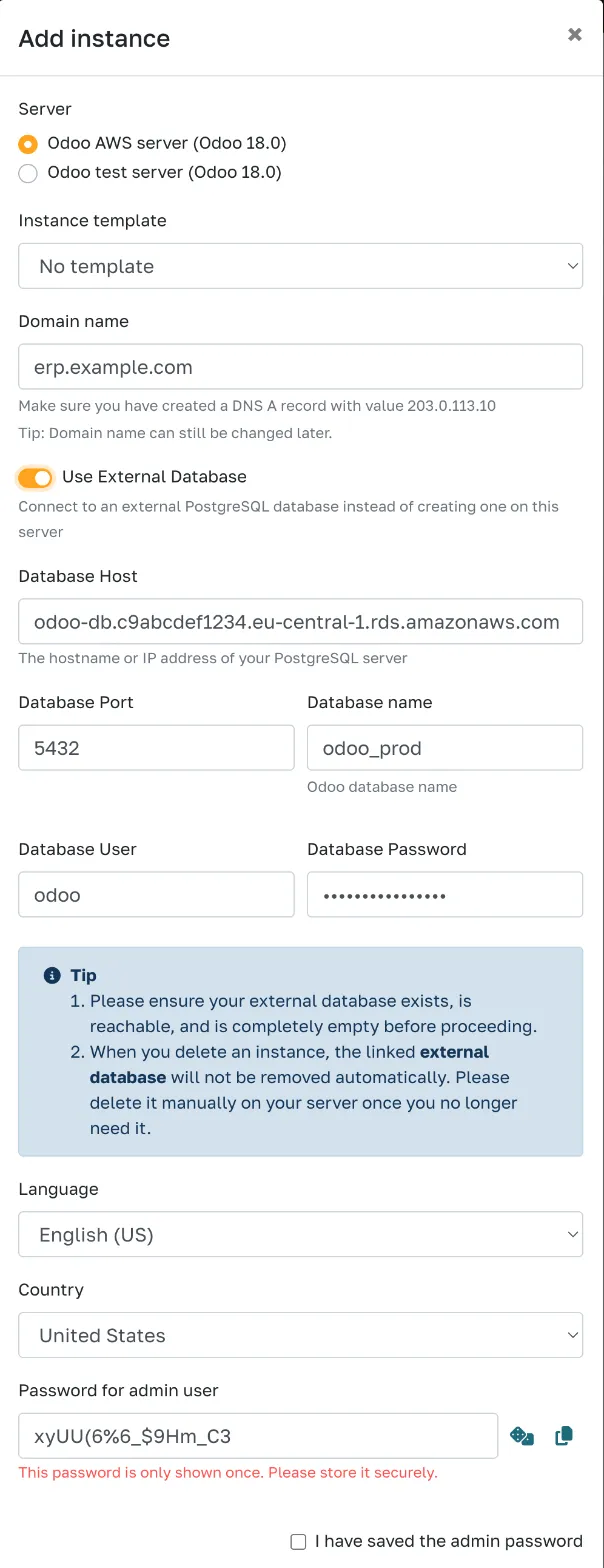
Click Show advanced options and turn on Use External Database. You should see the database fields.
-
Fill in the fields:
Field Value Database Host <your-database-endpoint>Database Port 5432Database name <your-database-name>: the Initial database name from Step 1, for exampleodoo_prodDatabase User odoo: the master username from Step 1Database Password The master password from Step 1 -
Password for admin user is already filled in. Copy it and save it, or type your own. Then select I have saved the admin password.
-
Click Create Instance. You should see “The instance creation is in progress”, and a few minutes later your domain opens the Odoo login page.
Step 3. Store attachments in S3
Section titled “Step 3. Store attachments in S3”Odoo still saves uploaded files on the server disk. Move them to S3, so the server disk holds little that you cannot rebuild.
- Follow the S3 attachments guide from the top: install the storage modules, create the storage record, up to the end of Step 4. Check that new files go to the bucket. Turn on versioning for the bucket. You should see a test upload as an object in the bucket.
- Come back here for Step 4.
Small images and web assets stay in the database.
Step 4. Check EC2 automatic recovery
Section titled “Step 4. Check EC2 automatic recovery”AWS turns on automatic recovery by default for supported instance types. Check it once.
- In the EC2 console, open Instances and select your server. Its public IPv4 address is the server IP in My Cloudpepper.
- On the Details tab, compare the Instance type with the supported types. You should see a listed type, such as
t3.largeorm6i.large. - Choose Actions → Instance settings → Change auto-recovery behavior.
- Choose Default (On), then Save.
If a recovery fails for lack of capacity, stop and start the server in the EC2 console. On an unsupported type, Default (On) does nothing: plan a short stop and use Actions → Instance settings → Change instance type.
Step 5. Set up backups
Section titled “Step 5. Set up backups”| Layer | What it covers | Where you set it | How you restore |
|---|---|---|---|
| AWS automated backups | The database, between the earliest and latest restorable times that AWS shows | Step 1 | Point-in-time restore |
| Cloudpepper backups | A database dump, the local files and the addons, stored with your backup provider | My Cloudpepper | Download the archive |
| S3 versioning | The attachments in the bucket | The S3 guide | Earlier object versions |
| EBS snapshots | The server disk: Odoo code, configuration, local files | AWS Backup or Data Lifecycle Manager | Replace the root volume |
- In My Cloudpepper, set a backup schedule for the instance. See Schedule Odoo backups. You should see the schedule on the instance’s Backups tab.
- Create a daily snapshot policy for the server’s disk in AWS Backup or Amazon Data Lifecycle Manager. The next day, you should see a snapshot of the server’s volume in the EC2 console under Snapshots.
Step 6. Test a failover
Section titled “Step 6. Test a failover”Do this once before go-live, at a quiet moment. Tell your users to expect an interruption: one to two minutes is typical, but it can take longer.
-
In a terminal on a Mac or Linux computer, or over SSH on the server, start a check that opens the Odoo login page every two seconds. You should see
200on each line.Terminal window while true; do echo "$(date +%T) $(curl -s -m 5 -o /dev/null -w '%{http_code}' https://<your-domain>/web/login)"; sleep 2; done -
In the RDS console, open Databases and start the failover:
- RDS Multi-AZ: select
odoo-db, choose Actions → Reboot, select Reboot with failover? and choose Reboot. - Aurora: select the writer instance, choose Actions → Failover, then Failover on the confirmation page.
- RDS Multi-AZ: select
-
Watch the check. You should see errors or
000for a short time, then200again. Note how long the errors lasted. -
Press Ctrl+C to stop the check.
-
In Odoo, change a record, save it and open an attachment. You should see the change saved and the file open.
The test passes when Odoo answers 200 again without a restart, close to the typical failover time in the table above. If errors last more than five minutes, see Troubleshooting.
The primary now runs in the other zone. Leave it there, unless you measure slower Odoo pages: failing back causes a second interruption.
Restore after a failure
Section titled “Restore after a failure”For deleted or damaged data, restore the database to an earlier time. For a damaged server disk, restore the disk.
Restore the database to a point in time
Section titled “Restore the database to a point in time”A point-in-time restore makes AWS build a new database as it was at a moment you choose. The new database has a new endpoint, so you point Odoo at it.
-
In My Cloudpepper, open the instance and click Stop. You should see the Stop button disappear.
-
In the RDS console, choose Automated backups, select
odoo-dband choose Actions → Restore to point in time. -
Choose Custom and enter a time just before the problem, in your local time zone.
-
For the identifier, enter
odoo-db-restored. -
Choose the same instance class as
odoo-db. For RDS, choose the Multi-AZ DB instance option again. -
For VPC security group, choose the existing
rds-ec2-group ofodoo-dband removedefault. Keep Public access at No. -
Choose Restore to point in time. You should see
odoo-db-restoredas Creating, then Available. -
Aurora only: if the restored cluster has no reader, select it and choose Actions → Add reader in another zone.
-
Copy the endpoint of
odoo-db-restored: the Endpoint for RDS, the Writer endpoint for Aurora. This is<your-new-endpoint>. -
Over SSH, point Odoo at the new endpoint. The dashboard shows
db_hostread-only, so edit the file on the server. You should seedb_host = <your-new-endpoint>.Terminal window sudo sed -i 's/^db_host = .*/db_host = <your-new-endpoint>/' /var/odoo/<your-database-name>/odoo.confsudo grep '^db_host' /var/odoo/<your-database-name>/odoo.conf -
Attachments removed after that moment: bring back their previous versions in the bucket (S3 guide: Restore a backup). Files added after that moment can stay.
-
If you updated Odoo or a module after that moment, first return that code to the version that matches the restored database.
-
In My Cloudpepper, click Restart to start Odoo. You should see the login page, and the newest records date from before the restore time.
-
When the data is correct, turn off deletion protection on
odoo-db(Modify) and delete it. AWS charges for it until you do.
Cloudpepper backups read the endpoint from the same file, so they follow the new database.
Restore the server disk
Section titled “Restore the server disk”Use this when the server disk is damaged or files on it are lost. The server must be running. The snapshot also brings back the odoo.conf and the Odoo code of its day.
-
In the EC2 console, select your server and choose Actions → Monitor and troubleshoot → Replace root volume.
-
For Restore, choose Snapshot and a snapshot of this server’s own root volume, taken after your last module update and after your last database switch. For an AWS Backup image, choose Image.
-
Choose Create replacement task. AWS restarts the server. You should see the task succeeded on the Storage tab, under Recent root volume replacement tasks.
-
Over SSH, check the database endpoint. You should see your current endpoint. If not, set it as in step 10 of the database restore and click Restart.
Terminal window sudo grep '^db_host' /var/odoo/<your-database-name>/odoo.conf
The server keeps its instance ID and IP addresses, so Cloudpepper keeps managing it.
Troubleshooting
Section titled “Troubleshooting”“Failed to create instance” right after you click Create Instance
Section titled ““Failed to create instance” right after you click Create Instance”Before it creates the instance, Cloudpepper checks from your server that it can reach the database and that both PostgreSQL major versions match. The dashboard shows only this message. Check in this order:
- Database Host is the endpoint from Step 1. For Aurora, use the Writer endpoint.
- Database name, Database User and Database Password are the Initial database name, the master username and the master password from Step 1.
- The AWS database has the PostgreSQL major version of your server (Before you start). If not, create a new AWS database with that version.
- The database’s
rds-ec2-security group has an inbound rule for PostgreSQL (port 5432) from this server’sec2-rds-group. Step 1 creates both with Connect to an EC2 compute resource. Do not useCloudpepper-publicas the source: other Cloudpepper servers in the same VPC share it.
To see the exact error, run the same checks over SSH:
psql "host=<your-database-endpoint> port=5432 user=odoo dbname=<your-database-name> sslmode=require connect_timeout=10" -tAc 'SHOW server_version_num'sudo -u postgres psql -tAc 'SHOW server_version_num'A timeout points to item 4, “password authentication failed” to the password, and “database … does not exist” to the database name. The first two digits of both numbers must match, for example 170006 and 170004. If the second command fails, the local PostgreSQL of the server is not running: Cloudpepper needs it for this check.
The instance shows an error after creation
Section titled “The instance shows an error after creation”Read the installation log over SSH:
sudo tail -n 50 /var/odoo/<your-database-name>/logs/install.logIf the installation stopped halfway, start again with an empty database. Do this only for the new database of Step 1, never for a database that holds data.
-
In My Cloudpepper, delete the instance. The AWS database stays.
-
Over SSH, connect with the master password:
Terminal window psql "host=<your-database-endpoint> user=odoo dbname=postgres sslmode=require" -
Empty the database by creating it again. You should see
DROP DATABASEandCREATE DATABASE.DROP DATABASE <your-database-name>;CREATE DATABASE <your-database-name>;\q -
Repeat Step 2.
An Odoo AI app does not install (Odoo 19)
Section titled “An Odoo AI app does not install (Odoo 19)”Odoo’s AI features need the PostgreSQL extension vector. Cloudpepper adds it only to databases on the server. Add it to the AWS database over SSH, with the master password, then install the app again. You should see CREATE EXTENSION.
psql "host=<your-database-endpoint> user=odoo dbname=<your-database-name> sslmode=require" -c 'CREATE EXTENSION IF NOT EXISTS vector;'Odoo shows database errors after a failover
Section titled “Odoo shows database errors after a failover”-
In the RDS console, check that the database is Available.
-
In My Cloudpepper, click Restart on the instance.
-
If errors continue, read the Odoo log over SSH:
Terminal window sudo tail -n 100 /var/odoo/<your-database-name>/logs/odoo-server.log
AWS still charges after you delete the instance
Section titled “AWS still charges after you delete the instance”Deleting the instance in Cloudpepper keeps the AWS database and the S3 bucket. Delete them in AWS when you no longer need them.