Store Odoo Attachments in S3 Object Storage
By default, Odoo keeps uploaded files (chatter attachments, invoice PDFs, product images) in the filestore on the server disk. This guide sends new files to an S3-compatible bucket instead, with the free OCA modules fs_storage, fs_attachment and fs_attachment_s3. It is for the administrator whose server disk fills up with attachments.
At a glance
Section titled “At a glance”- Time: About 45 minutes, twice: first on a staging instance, then on production. Moving existing files is extra, with Odoo stopped.
- Cost: The modules are free. Depending on the provider, you pay for storage, requests and traffic: for example about $2.45 a month to store 100 GB on Amazon S3 Standard in Frankfurt (
eu-central-1, AWS list price of 27 October 2026). Check your case in the AWS pricing calculator. - Plans: Base, Pro and Agency
- Odoo versions: 16.0 to 19.0
- What changes: New attachments go to the bucket. Existing files stay on the disk until you move them. Small images and web assets stay in the database.
Before you start
Section titled “Before you start”- Try it on a staging instance first. The OCA rates the modules Beta. Do Steps 1 to 4 on a staging instance with a test bucket, then on production with the production bucket.
- Choose where the files go. This guide uses Amazon S3: you create the bucket and its key in the AWS console. Pick the AWS region of your server, or the one nearest to it: traffic stays fast and often free (AWS does not charge for S3-to-EC2 traffic in one region). Other providers are covered at the end.
- Use one bucket for each Odoo database. Object names include the attachment ID, so databases that share a bucket can overwrite each other’s files.
- Know what backups cover. Cloudpepper backups do not contain the files in the bucket. Bucket versioning (the provider keeps each old or deleted file as a previous version) is your file backup. Cloudflare R2 has no versioning, so it has no file backup: choose another provider for production.
- Switch on developer mode in Odoo (Settings → Activate the developer mode). Step 3 uses the Technical menu.
- SSH access, only if your instance runs on the system Python (Step 2 shows how to check) or if you move existing files. See Connect via SSH with Termius.
Step 1. Create a private bucket and a key
Section titled “Step 1. Create a private bucket and a key”At the end of this step you have a private Amazon S3 bucket that keeps old versions, and an access key with read and write access to that bucket only. AWS shows the secret key only once: copy it when it appears.
-
In the AWS console, open S3 and click Create bucket.
-
Choose General purpose, enter
<your-bucket-name>and select the region of your server. -
Keep Block all public access switched on and ACLs disabled.
-
Under Bucket Versioning, select Enable.
-
Click Create bucket. You should see the bucket in the list.
-
Open IAM (Identity and Access Management: the AWS service for users and permissions) → Policies → Create policy → JSON and paste this policy:
{"Version": "2012-10-17","Statement": [{"Effect": "Allow","Action": ["s3:ListBucket", "s3:GetBucketLocation"],"Resource": "arn:aws:s3:::<your-bucket-name>"},{"Effect": "Allow","Action": ["s3:GetObject", "s3:PutObject", "s3:DeleteObject", "s3:AbortMultipartUpload"],"Resource": "arn:aws:s3:::<your-bucket-name>/*"}]} -
Click Next, name the policy
odoo-<your-instance>and click Create policy. -
Open IAM → Users → Create user. Enter a user name of at most 64 characters, for example
odoo-<your-instance>. Do not give console access. Click Next. -
Select Attach policies directly, select your new policy, click Next, then Create user.
-
Open the user → Security credentials → Create access key. Select Application running outside AWS and click Next, then Create access key. Click Show to see the Secret access key next to the Access key.
This key cannot delete previous versions, so with versioning on, no delete by Odoo is final. AWS recommends a 15-minute wait between enabling versioning and the first write; Steps 2 and 3 take longer than that.
Step 2. Install the storage modules
Section titled “Step 2. Install the storage modules”The Marketplace adds the OCA storage repository for your Odoo version, installs the module and, on a venv instance, its Python packages.
-
In My Cloudpepper, click the domain of your instance. On the Dashboard tab, click Paths & shell commands and read Python Interpreter. A path that ends in
/venv/bin/python3is a virtual environment (venv: a separate Python installation for this instance only);python3is the system Python. -
System Python only: connect to the server over SSH (see Connect via SSH with Termius) and install the packages:
Terminal window sudo pip3 install "fsspec[s3]>=2025.3.0" python-slugify -
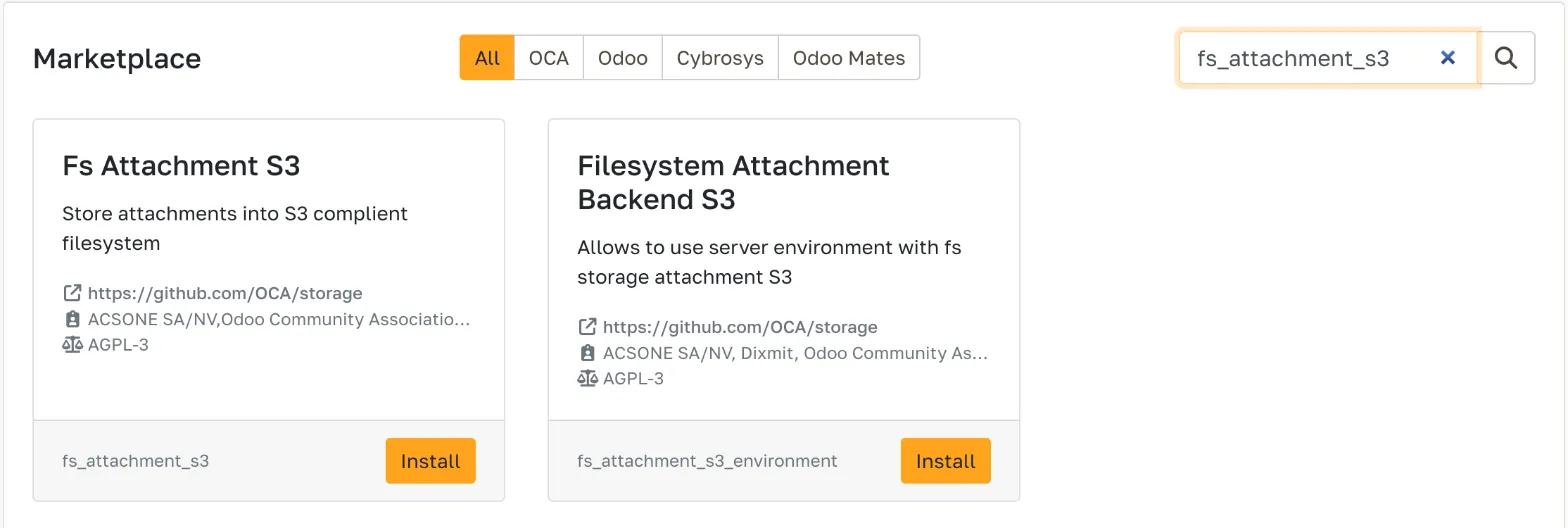
Open the Marketplace tab and search for
fs_attachment_s3. -
On the Fs Attachment S3 card, click Install. Odoo stops for the install and restarts. Leave the Filesystem Attachment Backend S3 card alone: that variant is for server-wide configuration.
-
Wait until the card shows Installed. In Odoo, Apps lists Fs Attachment S3 as installed.
Step 3. Create the storage record
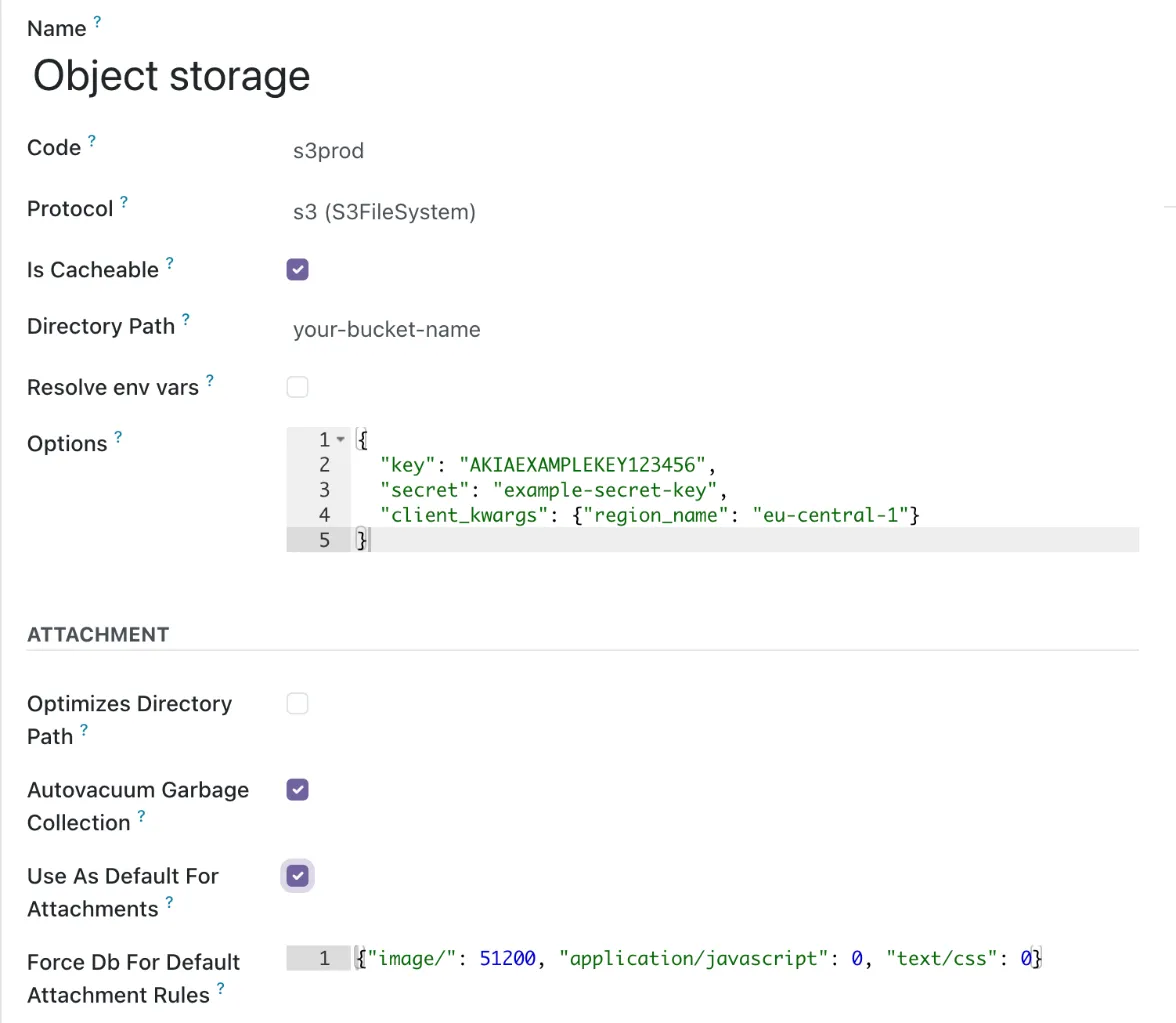
Section titled “Step 3. Create the storage record”- In Odoo, open Settings → Technical → FS Storage and click New.
- Fill in the fields. Keep the other fields on their defaults.
| Field | Value | Why |
|---|---|---|
| Name | Object storage |
Any name. |
| Code | s3prod |
Odoo writes this code into every stored file reference (s3prod://…). Never change it later. |
| Protocol | s3 |
The S3 protocol. |
| Directory Path | <your-bucket-name> |
The bucket name only, not a URL. |
| Options | the block in item 3 | The endpoint (the S3 API address of the provider), region and key. |
-
In Options, paste this block and replace the three values.
<your-region>is the bucket region, for exampleeu-central-1. For another provider, use its block from Other S3 providers.{"key": "<your-access-key>","secret": "<your-secret-key>","client_kwargs": {"region_name": "<your-region>"}} -
Click Save, then Test connection. You should see Connection Test Succeeded!. A hidden marker file appears in the bucket.
-
Under Attachment, tick Use As Default For Attachments and click Save. New attachments now go to the bucket. Odoo then shows Force Db For Default Attachment Rules with its default rules, which keep small images and web files in the database. Keep the default, and keep Is Cacheable and Autovacuum Garbage Collection ticked.
Step 4. Check that new files go to the bucket
Section titled “Step 4. Check that new files go to the bucket”- Upload a PDF in the chatter of any record. You should see it in the chatter.
- Open the bucket in your provider’s console. You should see a new object with a name based on the file name.
- Download the attachment from Odoo. It should open as before.
Optional. Move existing attachments to the bucket
Section titled “Optional. Move existing attachments to the bucket”The OCA command moves every attachment to the bucket, except those its rules keep in the database, and deletes the local copies after it saves. Stop Odoo first: with users working, a locked attachment can be skipped while its file on disk is deleted, and that file is lost. One file moves at a time, so a large filestore takes hours. Plan a maintenance window.
-
On the Backups tab, click Create backup. Wait until the backup is complete. It contains the local files, so it is your way back.
-
Connect to the server over SSH and note the disk use. Then start a
screensession, so the job continues if the connection drops.Terminal window df -h /sudo apt install -y screen && screen -S migrate -
In My Cloudpepper, click Stop on the instance. You should see that Odoo is no longer reachable.
-
Open the Odoo shell (a Python prompt with access to the database). Copy the Odoo Shell Access command from Dashboard → Paths & shell commands and run it. You should see a
>>>prompt. -
Count the files that are still on the disk:
local = ['!', ('store_fname', '=like', 's3prod://%'), ('store_fname', '!=', False), '|', ('res_field', '=', False), ('res_field', '!=', False)]env['ir.attachment'].search_count(local) -
Move the files and save the result:
env['ir.attachment'].force_storage()env.cr.commit() -
Count again. You should see
0.env['ir.attachment'].search_count(local)On Odoo 19, files that were already missing on the disk stay in the count, and the log lists them as
does not exist, skipping migration. -
Press
Ctrl+Dto leave the shell, then click Restart in My Cloudpepper to start Odoo. -
Open a few older attachments in Odoo. They should open as before.
df -h /shows less disk use than in item 2.
Backups, restores and staging
Section titled “Backups, restores and staging”Restore a backup
Section titled “Restore a backup”A Cloudpepper backup holds the database (every attachment record, and the storage record with its key) and the files still on the server disk. The bucket holds the rest; with versioning on, a file Odoo removed stays there as a previous version.
- Restore the backup as usual (Backup & recovery). The restored database points at the same bucket with the same key.
- Open a few attachments that existed when the backup was made. They should open.
- If one opens empty, first check the modules, the key and Test connection. If the file was removed after the backup, bring back its previous version. On Amazon S3: open the bucket, switch on Show versions, select the Delete marker of the file and delete the marker. On other providers, use their console or an S3 tool.
Files added after the backup stay in the bucket. Odoo no longer refers to them.
Staging instances
Section titled “Staging instances”A new or refreshed staging instance gets a copy of the production database, so it uses the production bucket and key. A delete or rename on staging then removes or moves a file that production still uses.
Once: create a read-only key for the production bucket.
- Amazon S3: a second IAM user with only
s3:ListBucket,s3:GetBucketLocationands3:GetObject. - Cloudflare R2: a token with Object Read only.
- DigitalOcean Spaces: a Limited access key with Read.
- Hetzner: a key in a separate project, granted
s3:ListBucket,s3:GetObjectands3:GetObjectVersionby a bucket policy on the production bucket. - Other providers: a key with read and list rights only.
After every Create Staging, Refresh or restore into staging, before anyone uses the staging instance:
- In the staging Odoo, open Settings → Technical → FS Storage → your storage record.
- Untick Use As Default For Attachments and Autovacuum Garbage Collection (the Odoo job that deletes unused files from the bucket).
- In Options, replace
keyandsecretwith the read-only key. Click Save. - Open an older attachment on staging. It should open. New uploads on staging now stay on the staging server disk.
Renaming an attachment that lives in the bucket fails on staging. Deleting one removes only the staging record; the file stays in the bucket.
Switch back to local storage
Section titled “Switch back to local storage”- In Odoo, open Settings → Technical → FS Storage → your storage record.
- Untick Use As Default For Attachments and click Save. New attachments go to the server disk again.
- Upload a PDF in the chatter. You should see no new object in the bucket.
Files already in the bucket stay there and keep working. The OCA modules have no command to move files back to the disk. To undo a move of existing files, restore the backup you made before it; changes made after that backup are lost.
Other S3 providers
Section titled “Other S3 providers”Amazon S3 needs only the AWS console. These providers work too, but some steps take more technical work: Hetzner and DigitalOcean need a command-line tool to switch on versioning. Create the bucket and the key here, then come back to Step 2. In Step 3, paste the provider’s Options block from here.
Hetzner Object Storage
Section titled “Hetzner Object Storage”-
In the Hetzner Console, open your project → Object Storage → Create Bucket.
-
Select a location near your server (
fsn1,nbg1orhel1), enter<your-bucket-name>and keep the visibility Private. Click Create & Buy now. You should see the bucket in the list. -
Open Security → S3 Credentials → Generate credentials and enter a description. You should see the access key and the secret key.
-
On your computer, with the AWS CLI installed, turn on versioning:
Terminal window AWS_ACCESS_KEY_ID=<your-access-key> AWS_SECRET_ACCESS_KEY=<your-secret-key> aws s3api put-bucket-versioning --bucket <your-bucket-name> --versioning-configuration Status=Enabled --endpoint-url https://<your-location>.your-objectstorage.com --region <your-location> -
Check the result. You should see
"Status": "Enabled":Terminal window AWS_ACCESS_KEY_ID=<your-access-key> AWS_SECRET_ACCESS_KEY=<your-secret-key> aws s3api get-bucket-versioning --bucket <your-bucket-name> --endpoint-url https://<your-location>.your-objectstorage.com --region <your-location>
Hetzner applies bucket changes with a delay of up to 15 minutes.
Options block for Step 3:
{ "key": "<your-access-key>", "secret": "<your-secret-key>", "endpoint_url": "https://<your-location>.your-objectstorage.com", "client_kwargs": {"region_name": "<your-location>"}, "config_kwargs": {"s3": {"addressing_style": "virtual"}}}<your-location> is fsn1, nbg1 or hel1.
DigitalOcean Spaces
Section titled “DigitalOcean Spaces”-
In the control panel, open Spaces Object Storage → Create Bucket.
-
Select a region near your server, choose Standard Storage and enter
<your-bucket-name>. Click Create a Spaces Bucket. You should see the bucket. -
Open Access Keys → Create Access Key. Choose Limited access, select your bucket and set Permissions to Read/Write/Delete. Click Create Access Key. You should see the key and its secret. This is the key for Odoo.
-
Create a second key with Full access. Only a full-access key can change versioning.
-
On your computer, with the AWS CLI installed, turn on versioning with the full-access key:
Terminal window AWS_ACCESS_KEY_ID=<your-full-access-key> AWS_SECRET_ACCESS_KEY=<your-full-access-secret> aws s3api put-bucket-versioning --bucket <your-bucket-name> --versioning-configuration Status=Enabled --endpoint-url https://<your-region>.digitaloceanspaces.com --region <your-region> -
Open the bucket → Settings. You should see Object Versioning: Enabled.
-
Delete the full-access key on the Access Keys tab.
Options block for Step 3:
{ "key": "<your-access-key>", "secret": "<your-secret-key>", "endpoint_url": "https://<your-region>.digitaloceanspaces.com", "client_kwargs": {"region_name": "<your-region>"}}<your-region> is the Spaces region, for example fra1. Use the limited-access key here, not the full-access key.
Cloudflare R2
Section titled “Cloudflare R2”- In the Cloudflare dashboard, open R2 Object Storage → Create bucket. Enter
<your-bucket-name>and click Create bucket. You should see the empty bucket. R2 buckets are private unless you add public access. - On the R2 Object Storage page, click Manage next to API Tokens → Create Account API token.
- Set Permissions to Object Read & Write and limit the token to your bucket.
- Click Create Account API token. You should see the Access Key ID and the Secret Access Key.
Options block for Step 3:
{ "key": "<your-access-key>", "secret": "<your-secret-key>", "endpoint_url": "https://<your-account-id>.r2.cloudflarestorage.com", "client_kwargs": {"region_name": "auto"}, "fixed_upload_size": true}R2 needs fixed_upload_size for large uploads. A bucket in a jurisdiction uses that jurisdiction’s endpoint, for example https://<your-account-id>.eu.r2.cloudflarestorage.com.
OVHcloud, Backblaze B2 or MinIO
Section titled “OVHcloud, Backblaze B2 or MinIO”- Create a private bucket in a supported location near your server.
- Turn on versioning:
- OVHcloud: enable the versioning option when you create the bucket.
- Backblaze B2: versioning is always on. Set how long previous versions stay in Lifecycle Settings.
- MinIO: enable versioning on the bucket in the MinIO console or with the MinIO client.
- Create a key with read and write access to this bucket only:
- OVHcloud: create an Object Storage user, then add it to the bucket (… → Add a user to a container) with read and write access.
- Backblaze B2: create a standard application key (not the master key).
- MinIO: create an access key whose policy covers this bucket only.
- You should see the bucket in the provider’s console, and the access key and the secret key.
Options block for Step 3:
{ "key": "<your-access-key>", "secret": "<your-secret-key>", "endpoint_url": "<your-endpoint>", "client_kwargs": {"region_name": "<your-region>"}}| Provider | <your-endpoint> |
<your-region> |
|---|---|---|
| OVHcloud | https://s3.<region>.io.cloud.ovh.net |
the region code in lowercase, for example gra |
| Backblaze B2 | https://s3.<region>.backblazeb2.com |
the region in the endpoint, for example us-west-004 |
| MinIO | the S3 API address, for example https://<your-minio-host>:9000 (not the console address) |
the region set on the server, us-east-1 unless changed |
Troubleshooting
Section titled “Troubleshooting”Odoo shows “external dependency is not met”
Section titled “Odoo shows “external dependency is not met””The Python packages are missing, or the Marketplace card shows Enable instead of Installed.
- Check Python Interpreter (Step 2, item 1).
- System Python: run the
pip3command from Step 2. If pip answersexternally-managed-environment, stop and contact support. - On the Marketplace tab, click Enable on the Fs Attachment S3 card. On a venv instance this installs the Python packages again. Wait until the card shows Installed.
“Connection Test Failed!”
Section titled ““Connection Test Failed!””Odoo cannot reach or write to the bucket. Check, in this order:
- Options is valid JSON: double quotes, no trailing comma,
truein lower case. endpoint_urlis the provider’s S3 endpoint, not the bucket URL or a console address.region_namematches the value for your provider in Step 3 or Other S3 providers.- Directory Path is exactly the bucket name.
- The key has read and write access to that bucket (Step 1).
New files still land on the server disk
Section titled “New files still land on the server disk”- Check that Use As Default For Attachments is ticked on the storage record.
- Test with a PDF. Small images and web assets go to the database by design.
The move of existing files stops with an error
Section titled “The move of existing files stops with an error”An error does not mean that nothing changed. Some files can already be in the bucket, and an error after the save can leave local copies behind.
- Keep Odoo stopped.
- Check the log, and count the files that are still on the disk (the move, item 5).
- Fix the cause (often the key or the network).
- Run the move again from item 4. Click Restart after the count is
0.
Attachments open empty after a restore or a server move
Section titled “Attachments open empty after a restore or a server move”The database points at s3prod://… files that Odoo cannot read.
- Check that the modules and the Python packages are present on the new server (Step 2).
- Check that the key in the storage record still exists at the provider, and click Test connection.
- If files were removed, bring back their previous versions (Restore a backup).